Use-case: Smart things
What? Store data that two or more prototypes share with each other while being online at the same time.
CONTEXT
This use-case is about "things" in a smarthome context that communicate with each other about sensor data such as temperature measurements. The communication between the two "things" is implemented with OOCSI and we use Data Foundry to store the exchanged temperature data in a safe database. Why? We can use the recorded data for future analysis with data mining techniques to find out what the ideal pre-determined settings of the thermostat is, and how that might change over time. Or we could train a machine learning model with this information to offer predictions to the user.
EXAMPLE
As an example for this use-case we take two simple IoT prototypes: (1) a centralized hub for adjusting the temperature in the house and (2) a thermostat that automatically changes temperature according to the presence of people in a household. The central hub (sending data) only goes online when people change the temperature in order to override predetermined settings of the thermostat. Also, it sends the new temperature to the thermostat and storing the data in an Entity dataset that is created in Data Foundry. Meanwhile, the thermostat is always online, looking for data that can be received from the central hub.
Got interested? The next steps provide you the necessary information for your project.
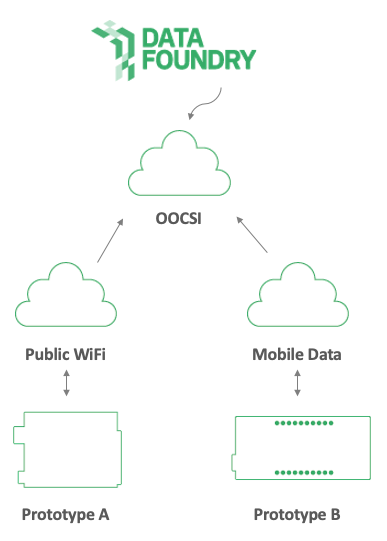
WHAT YOU NEED
- Two prototypes, for example, one running ESP32 and one running on Processing that are connected to the Internet. They can connect in the following ways:
- An open wifi network (at TU/e)
- A private wifi network (deployment location)
- A private mobile data connection (mobile hotspot and 4G)
- The two prototypes are connected to the OOCSI network and send each other data on a channel.
- A project created in Data Foundry, with an active IoT dataset, see below how to do that
HOW TO USE THIS
First complete the basic setup
- Register or login
- Create a new project
- Add a new IoT dataset to the project
- Add new devices for both prototypes to the project
Collect and store data
For the next part, we assume that the prototypes are sending data already successfully via OOCSI.
First we will configure the Data Foundry settings:
- Browse to the dataset page, ensure that the dataset is active
- Scroll down to the configuration area on the same page.
- Go to the second tab in the configuration screen: OOCSI stream
- Enter the channel name that is used in the communication between the two prototypes. Double-check that you type is correctly (including numbers, dashes and UPPERCASE letters).
- Click "save".
Second, you need to decide whether you want to accept all data from the channel that you just entered, or if you want ot restrict data collection to only a few devices (see step 4 in the basic setup).
Allow for all
If you allow for all data from the channel (see above) to go into your dataset, then there is only one thing to do:
- Browse to the dataset page, click on the "edit" icon
- Scroll down until you find an option "open participation", switch this ON
- Click "save", done
Allow only devices in the project
If you want to effectively white-list only devices in the project, then you don't need to change anything in Data Foundry. But you will need to add the device ID into the data sending parts of the prototype code.
Let's see how this works for a prototype in Java/Processing:
// replace CLIENT_HANDLE by a unique name
// that you can invent freely (no spaces though)
OOCSI oocsi = new OOCSI(this, "CLIENT_HANDLE", "oocsi.id.tue.nl");
// replace CHANNEL with the channel that you
// use to exchange data between the prototypes
oocsi.channel("CHANNEL")
	// replace DEVICE by the id of a device
	// that is registered in your project
	// looks like this: d9sd94t9wg8sdg8g
	.data("device_id", "DEVICE")
	// optional activity marker
	.data("activity", "EVENT or ACTIVITY")
	// this is your actual data, feel free to change this
	.data("airquality", 0.67)
	.data("doorclosed", false)
	// don't forget to send the event
	.send();
And this is how it works in Arduino/ESP:
// replace CLIENT_HANDLE by a unique name
// that you can invent freely (no spaces though)
oocsi.connect("CLIENT_HANDLE", "oocsi.id.tue.nl", wifi_ssid, wifi_password, processOOCSI);
// replace CHANNEL with the channel that you
// use to exchange data between the prototypes
oocsi.newMessage("CHANNEL");
// replace DEVICE by the id of a device
// that is registered in your project
// looks like this: d9sd94t9wg8sdg8g
oocsi.addString("device_id", "DEVICE");
// optional activity marker
oocsi.addString("activity", "EVENT or ACTIVITY");
// this is your actual data, feel free to change
oocsi.addFloat("airquality", 0.67);
oocsi.addBool("doorclosed", false);
oocsi.sendMessage();
For other languages such as Python or Javascript, you can probably use the documentation on the configuration tab and follow the instructions as in the code examples above.
After you have configured either the dataset to allow for all data or to white-list devices in hte project, you can refresh the dataset page. You should soon see a chart with fresh events being recorded. Click "download" to get the CSV data or go to the data tool to visualise and export the data.