Use-case: Sleeping beauties
What? Two prototypes communicating information to each other without necessarily being online at the same time.
CONTEXT
There are some cases wherein it might be good to not always have your connected prototypes connected to the internet. Here we demonstrate why this is, and how this use case might apply to your project. Examples of a Sleeping Beauty case might apply to low-power devices in public spaces, or to prototypes that are deployed but have limited data collection capabilities. The data that is stored in Data Foundry offers a safe database, and also can be used to further apply, for instance, machine learning techniques to find out what the ideal pre-determined settings of the thermostat is, and how that might change over time.
EXAMPLE
As an example we take 2 simple IoT prototypes: (1) a centralized hub for adjusting the temperature in the house and and (2) a thermostat that automatically changes temperature according to the presence of people in a household. The central hub (sending data) only goes online when people change the temperature in order to override predetermined settings of the thermostat. Also, it sends the new temperature to the thermostat and storing the data in an Entity dataset that is created in Data Foundry. Meanwhile, the thermostat is always online, looking for data that can be received from the central hub.
You can do the Sleeping Beauties case yourself as well through the usage of Data Foundry! The next steps provide you the necessary information for your project.
WHAT YOU NEED
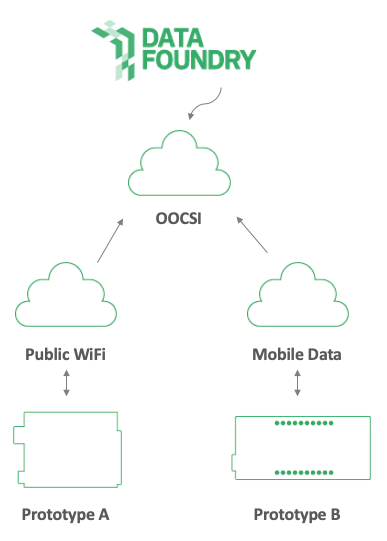
- Two prototypes that are connected to the Internet, e.g., an IoT prototype with an Arduino/ESP (connected to TUe wifi). These prototypes can connect through:
- An open wifi network (at TU/e)
- A private wifi network (deployment location)
- A private mobile data connection (mobile hotspot and 4G)
- A project created in Data Foundry, with an Entity dataset (not IoT dataset)
- HTTP API: this is more reliable and faster than the OOCSI API, because it sends out a single HTTP request and then the device can sleep again.
- Using OOCSI: OOCSI connection implemented in the the Java/Arduino code of your IoT prototype. Potentially a little slower because it first connects to the network, then sends a message and then sleep again
HOW TO USE THIS
Complete basic setup
The basic setup is as follows:
- Register or login
- Create a new project
- Add a new Entity dataset to the project
Collect and store data with OOCSI
Use the OOCSI network to add, retrieve, update and delete data items for the Entity dataset. This is option is available from a wide variety of platforms and technologies. A list with possible options is provided under the tab OOCSI API (on the right side). To enable this, follow these steps:
- First click on the HTTP API tab and generate a token, which is a long list of characters.
- Then move to the OOCSI API tab to set up a service
- Create a service by providing the service name in the input field
- Click on "save".
After this is setup, you can paste the example code into your existing ESP code and add, retrieve, update or delete a data item in the dataset. You can also do this with other platforms. Simply click on the example code of each different platform. Repeat this part for all prototypes. We will show the example for Python here:
# replace CLIENT_HANDLE by a unique name for this prototype
oocsi = OOCSI('CLIENT_HANDLE', 'oocsi.id.tue.nl')

# create call with 1.5sec timeout
# replace SERVICE_NAME by the service name you saved before
call = oocsi.callAndWait('SERVICE_NAME',
{
  # add authentication data
  # replace API_TOKEN by the token string from the HTTP API tab
  'api-token': 'API_TOKEN',
  # you can set resource_id and token by yourself
  'resource_id': 'testResource12345',
  'token': 'testToken12345',
  # add query type: add, get, update, delete
  'query': 'add',
  # add actual data for entity object
  'item1': 1,
  'item2': TRUE,
  'item3': 'three'
}, 1.5)

# check response in call object directly
if 'response' in call:
  print(call['response'])
else:
  print('response not found')
Collect and store data with HTTP API
Instead of using OOCSI to access this Entity dataset, you can also use the HTTP API. To access this API you need to create an API token ("api-token") and use this in the HTTP requests.
First click on the HTTP API tab and generate a token, which is a long list of characters. You need to use this "api-token" in your code along with a "resource_id" and "token" parameter. You can find examples for different platforms below. Here an example for Arduino/ESP:
// Add a data item to the dataset
String postMessage = "{\"param1\": 1, \"param2\": 3.4}";
http.begin("/datasets/entity/9/item/");
http.addHeader("Content-Type", "application/json");

// you can choose resource_id and token yourself
http.addHeader("resource_id", "username@example.org");
http.addHeader("token", "mysecretpassword");

// replace API-TOKEN with the token that you have generated before
http.addHeader("api_token",  "API-TOKEN");

int httpCode = http.POST(postMessage);
if(httpCode == HTTP_CODE_OK) {
	String jsonResponse = http.getString();
	// ...
}
The code snippets for updating, retrieving or deleting an object in the Entity dataset are similar.
Export data
- As soon as data is sent to the service, the data activity will appear just above the folders in the dataset. Check if the connection is active by sending some test data.
- Download the entire dataset by clicking on the download button.
- Or use the data export tool which can be found on the sidebar to make a selection out of the data that you want to export, or visualize it. For more info on the data export tool, click here.