Scripts
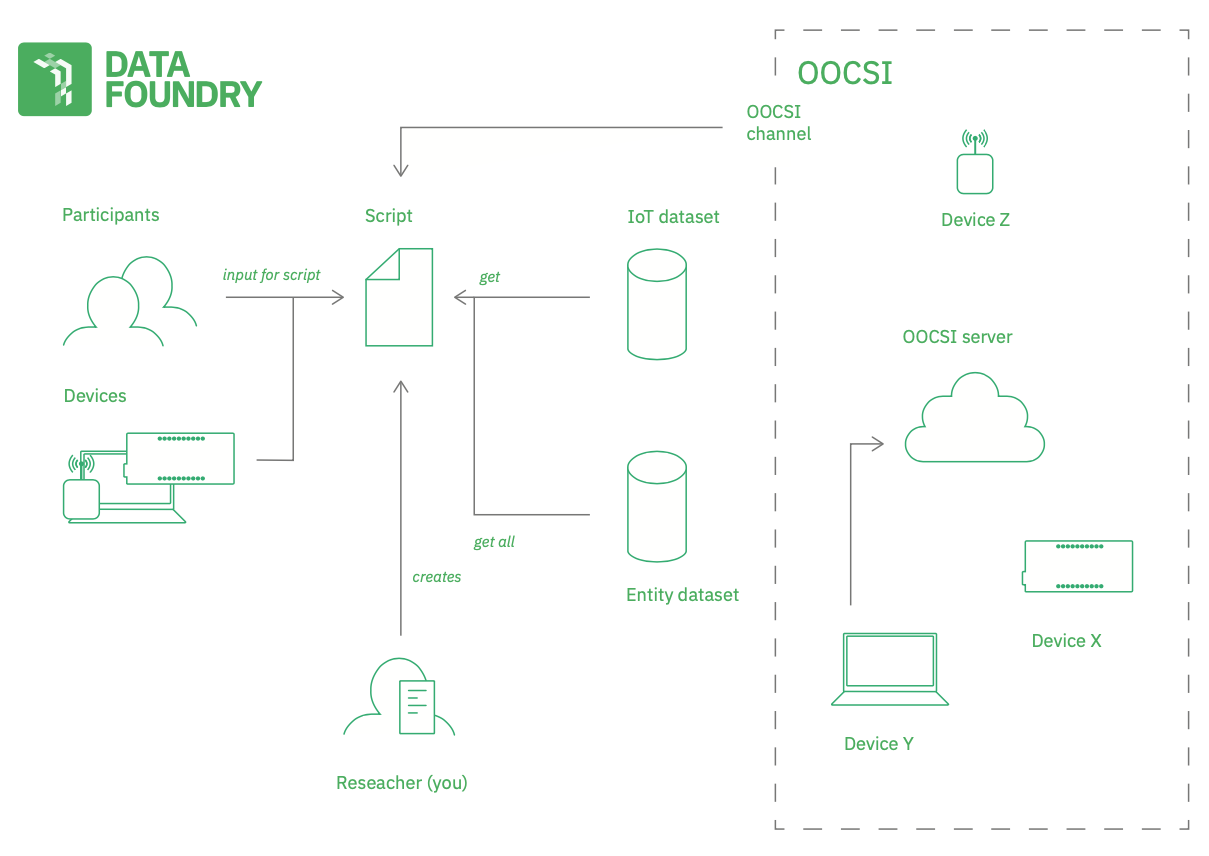
What the Data Foundry-OOCSI ecosystem lacked till this moment was an always-on scripting environment that would allow for small programs that process data from an OOCSI channel, update a database or user profile and trigger a state change in a physical product or service. While OOCSI is the plumbing, Data Foundry provides storage, scripting can connect these two with higher-level logic.
So, what are scripts? They are written in JavaScript and run on the Data Foundry server. Every script listens to events on OOCSI channels and process event data together with data from the script's project. Scripts have access to resources of a project (participants and devices) and the project's IoT and Entity datasets. While the IoT datasets can store timeseries data, the Entity datasets serve as database for things like user profiles, decision trees and content.
Any script in Data Foundry belongs to a project. Internally, scripts are stored as datasets (why? we are planning some more things in the future). So, to create a script you can browse to the scripting tool and create a script in one of your projects. Note that every user can have up to five scripts at this moment. These scripts can be in different projects or all in one project–this is completely up to you.
Testing a script
Before we get into live events from OOCSI channels, let's quickly see how to test scripts. On the scripts page, you see a larger scripting area that also shows the line numbers on the left side. Below, you see a smaller area with code on the left side. This is where you can enter data that will be used to test the script with.
If you have a script like this:
DF.print("Largest coordinate: " + Math.round(Math.max(data.x, data.y)));
You can test this with the following input:
var data = {
	x: 90,
	y: 110.5
}
The output shows up below the Test with data button. You can test as often as you want. Note that the test seems to be a little slow. Don't worry, we will optimize the script when installing it on an OOCSI channel and gain a speed-up of usually 700-800%.
Script input
Scripts are triggered and receive input data. The overview figure shows that different aspects of a project, but also data from IoT and Entity datasets is brought into the script context automatically. This means, you can make use of these data when running the script. See below for some examples.
Scripts and Events
Scripts react on events--either from OOCSI channels or from Telegram. For OOCSI, that means, a script listens to events on a particular channel. You can set this in the scripting view. The data of the triggering event is available from data, something like this:
// fresh event data
data = {
	item1: 10,
	item2: 12.345,
	item3: true,
	item4: 'string data'
}
If you would want to process this data in your script, you can refer to the data object and its properties directly:
// print data item
DF.print("received " + data.item4);

// check some condition in the data
if(data.item3) {
	DF.print("prototype is working fine");
} else {
	DF.print("send maintenance crew");
}
Script input from OOCSI channel
To get data from an OOCSI channel, you need to enable the script for a particular channel. There is a field to enter the OOCSI channel name on the script page. Press 'enable' to let the script be triggered by events from the channel. Use 'disable' to stop this.
Everytime the script is triggered from an event on the channel, the event data will be copied into the data object and is ready to be processed.
You have seen the DF.print() function in action. This function will print any text that you specify. Also, you can call it with an object and it will print the contents of the JavaScript object formatted as a JSON string:
// print data item
DF.print("all my new event data:");
DF.print(data);
The object serialization only works if the object is the only parameter of DF.print().
Script input from Telegram
Instead of receiving events from OOCSI, a script can also receive Telegram messages from researchers and participants in the same project. and the messages will become available in data.message. Reply to the message directly with DF.telegramReply('response').
DF.print("message: " + data.message)

// respond to message with a particular word or expression
if(data.message.contains("happy")) {
	DF.telegramReply("Great, tell me more about why you are happy.")
}
// respond to a message with an arith. expression
else if(data.message.match("[0-9+*/-]+")) {
	DF.telegramReply(eval(data.message))
}
// catch all response
else {
	DF.telegramReply("No idea, continue.")
}
A script that receives message data from Telegram will receive these both from participants and researchers in the project. This allows to test the script first, then roll it out for participants. If you would to craft different responses for participants and researchers, you can use the data.participant or data.researcher properties to check:
if(data.participant) {
	// participant_name contains the pseudonymous participant name
	DF.telegramReply("Hi, participant " + data.participant_name)
	// participant_id contains the id that can be used to retrieve data from an entity dataset
	//DF.telegramReply("Hi, participant " + data.participant_id)
}
else if(data.researcher) {
	// researcher_name contains the researcher's name
	DF.telegramReply("Hi, researcher " + data.researcher_name)
}
After checking, you can access the participant_id and researcher_id properties for more information.
Note that to enable Telegram registration for participants, you need to have a Diary dataset in your project, or a Media dataset with openParticipation. Only then, your participants will get the Telegram PIN number on their participant registration pages.
When a participant uploads media, e.g., a photo, video or audio message to the Telegram bot, these media files will be saved in a Media dataset (if available in the project). Also, if there is a script connected to Telegram, this script will receive a short message about this upload: PHOTO_UPLOAD, VIDEO_UPLOAD or AUDIO_UPLOAD. You can use these messages to track participant submissions in a multi-state submissions process. The file size limit for media files is 30MB.
Accessing data from a script
You can access project data, and IoT and Entity datasets in your project from a script. See below how to do that.
Project resources
All scripts are part of a project and you have read-access to all participants and devices in the project directly from the script. You can get the IDs, names, and configuration of participants, devices and wearables directly from two variables.
// list of participants in the project
participants = [
	{
		id: '1',
		participant_id: 'u123456789',
		name: 'P1',
		pp1: 'experiment',
		pp2: '',
		pp3: '',
		devices: [2],
		wearables: [3]
	},
	...
]

// list of devices in the project
devices = [
	{
		id: '2',
		device_id: 'd123456789',
		name: 'device1',
		pp1: 'experiment',
		pp2: '',
		pp3: '',
		participants: [1]
	},
	...
]

// list of wearables in the project
wearables = [
	{
		id: '3',
		wearable_id: 'w123456789',
		name: 'heartrate_tracker1',
		pp1: 'experiment',
		pp2: '',
		pp3: '',
		participants: [1]
	},
	...
]
What can you use these for? You need the IDs when saving data ("logging") into an IoT dataset (device IDs), or a diary dataset (participant IDs). Or for sending messages, see below.
In Data Foundry, participants, devices and wearables are sometimes grouped together ("all lamps of participant Bob, all gardening tools of participant Alex"). This clustering is also available from the project:
// list of devices in the project
clusters = [
	{
		name: 'P1 lamps',
		participants: [1],
		devices: [2],
		wearables: [3]
	},
	...
]
How can you use this in a script? As a start, you can print out the ids or names of your resources. Read on to see how to log data with the id of a device.
// print out id of first device in project
DF.print(devices[0].id);

// print name of first cluster in project
DF.print(clusters[0].name)

// print all participant names (using a for loop)
for(var i = 0; i < participants.length; i++) {
	DF.print(participants[i].name);
}
So, after this you have basically all the tools to start experimenting with resources such as participant, devices and wearables in a project.
Access IoT dataset from script
Although we can store data automatically from an OOCSI channel with IoT datasets, we can use scripts to process the data before inserting into a dataset. We can also compute extra values (mean, standard deviation, etc.). Let's see how this works:
// use the event and add more data
data.roundedXValue = Math.round(data.x)
data.roundedYValue = Math.round(data.y)

// log an event with new data
DF.eventData.log(devices[0].id, '', data)

// in addition: change activity based on values (if greater 100)
if(data.X > 100 && data.y > 100) {
	DF.eventData.log(devices[0].id, 'running', data)
} else {
	DF.eventData.log(devices[0].id, 'walking', data)
}
Storing data into an IoT dataset always follows the pattern: id, activity, data, see above.
Note that scripting access for IoT datasets only works if there is at least one IoT dataset available and active in your project. 'Active' means that the dataset has a start date before today and an end date in the future.
How to retrieve event data from IoT dataset? Use the function DF.eventData.get() to retrieve most recent events for an IoT dataset.
// retrieve up to 20 (default) most recent events
var iot = DF.eventData.get('')
DF.print(iot.length)

// retrieve up to 20 (default) most recent events for the first device
var iot1 = DF.eventData.get(devices[0].id)
DF.print(iot1.length)

// retrieve up to 2 most recent events for the first device
var iot2 = DF.eventData.get(devices[0].id, 2)
DF.print(iot2.length)
With this access to event data, we could, for instance, compute the mean over the last 10 events and use this somehow.
// retrieve up to 10 most recent events for the first device
var iot = DF.eventData.get(devices[0].id, 10)

// loop through items and compute mean
var result = 0;
for(var i = 0; i < iot.length; i++) {
	// incrementally compute the mean by summing values divided
	// by the total number
	result += iot[i].value1/iot.length;
}
DF.print("mean: " + result);
Note that at this moment, only the first active IoT dataset can be accessed in scripts.
Access Entity dataset from script
Entity datasets are useful to store participant or device-related meta data. For instance, we could store a participant profile that is updated on all their interactions with a prototype.
// get entry in device profile from entity dataset
var profile = DF.entity.get(devices[0].id)
// print out if necessary
//DF.print(profile)

// check incoming event data for activity
if(data.x > 100 && data.y > 100) {
	profile.activity = Math.min(data.x, data.y);
} else {
	profile.activity = 0;
}

// update device profile in entity dataset
var profile = DF.entity.update(devices[0].id, profile)
You can test this script with the following data:
var data = {
	x: 123,
	y: 148
};
The access functions for Entity datasets are very straight-forward: all require an id as the first argument. Retrieve an existing entry with df.entity.get(), add new entries with df.entity.add(), update existing entries with df.entity.update() and delete existing entries with df.entity.delete().
You can get all items in the Entity datasets in one go and works with them (updating them one-by-one, or deleting too old ones) by using the DF.entity.getAll() function:
// get all items
var allItems = DF.entity.getAll()

// print array of all items
DF.print(allItems)
You can use the DF.entity.getAllMatching(id) function to retrieve items with a resource_id that starts with the given id:
// filter by code
var code = "item_";

// get all items
var allMatchingItems = DF.entity.getAllMatching(code)

// print array of all items
DF.print(allMatchingItems)
Similar to the IoT dataset access, the read and write access to Entity datasets only works if your Project contains at least one Entity dataset that is currently active.
Reading data from ANY dataset
The previous two sections talk about reading and writing to IoT and Entity datasets. In addition, Data Foundry also supports reading from any dataset in a project, regardless of its type. This can be handy in looking up data, processing data from multiple datasets in a script and structuring datasets in such a way that not all information needs to be kept in a single dataset.
Ok, how to do that? The first step is to select the dataset to read from:
// select dataset with dataset ID, here the dataset has the ID 2
DF.eventData.from(2)
Based on this selection, we use get to retrieve items from the dataset. The get method can take four arguments: device ID, limit, start, end. The first one allows to filter the data by a specific participant, device or wearable. So, this ID relates to the type of dataset: for example, IoT datasets can be filtered by devices, Diary and Media datasets can be filtered by participants, and Fitbit and GoogleFit datasets can be filtered by wearables. In the following example, we use an IoT dataset and filter by a device:
// device ID can be from the devices in the project
// here first device in project
DF.eventData.from(2).get(devices[0].id)

// device ID can be an empty string
DF.eventData.from(2).get('')

// by the way, this is how you print the results to check:
var items = DF.eventData.from(2).get('')
DF.print(items)

// or like this:
DF.print(DF.eventData.from(2).get(''))
The second argument for get gives the maximum number of records returned. So, we can safely return the last n items in a larger dataset.
// limit the number of items to max. 4 (can be less)
DF.eventData.from(2).get('', 4)
The final two arguments for get allow for filtering the dataset by time. The third argument start is the start time of the filtering and the second end the end time. The results between start and end will be returned.
// retrieve max. 20 items without filtering for device or time
DF.eventData.from(2).get('', 20)

// filter results for the timeframe February 15 - March 15, 2021
var start = new Date('2021-02-15').getTime()
var end = new Date('2021-03-15').getTime()
DF.eventData.from(2).get('', 20, start, end)
You can also leave start or end open to return all results before or after a time. The default value for the time filter is -1.
// -1 is the default value for the time filtering
DF.eventData.from(2).get('', 20, -1, -1)

// filter results for the time before February 15
DF.eventData.from(2).get('', 20, -1, start)

// filter results for the time after March 15
DF.eventData.from(2).get('', 20, end)

// or:
DF.eventData.from(2).get('', 20, end, -1)
Writing to ANY IoT dataset
You can select the dataset with dataset() to log data to any IoT dataset in your project:
let data = { ... }

// select dataset with id 2, then log data to it
DF.dataset(2).log(devices[0].id, 'running', data)
Script output
When scripts are triggered and run, the result can be a new piece of data that is stored in an IoT or Entity dataset, or it can be a message to OOCSI or Telegram. The overview figure shows these possibilities. This means, you can trigger quite some things depending on the processing of your script. See below for some examples.

Send messages and notifications
You can send messages to OOCSI directly, to feed data into other datasets or to control devices and actuation. Using a script to send messages is a great way to alert researchers about new data entries or interesting data that differs from previously seen data. Telegram messages to selected participants can be a great way to trigger qualitative data entry such as answering a diary or responding to a question.
OOCSI messages
Sending OOCSI messages is very simple, just define the channel and the data to send. Everything else will be handled.
DF.oocsi('testchannel', {color: 123, position: 12.3});
Messages will be sent from the DataFoundry dispatch which cannot receive messages. So, this is an outlet only.
Telegram messages to researchers
You can use the Data Foundry Telegram bot to send message from a script to all connected researchers in the project. "Connected" means that owner or collaborators have to register themselves first in Telegram and have to choose the script's project as their active project.
Under these conditions, sending a message is easy: just call DF.telegramResearchers() with the message.
// send a Telegram message to all researchers in the project
DF.telegramResearchers('Hey, air quality is quite low today (167), perhaps check on participant 1?');
Telegram messages to participant
Similar to sending researchers in the project a message, you can also send a message to participants, just use the participant id as the first argument, then the message.
// retrieve id of first participant in project
var pid = participants[0].participant_id;

// send a Telegram message to this participant and turn the word 'diary' into a clickable link
DF.telegramParticipant(pid, 'Hey, you used your thermostat in a new way today, can you write a short \diary entry about this?');
Please use this feature responsibly.
Responding with Telegram keyboard buttons
When sending a Telegram response, you can add answer options in your response that will appear underneath the chat window as buttons. Telegram users can just click these buttons to respond to you. This is nice and fast and, mostly importantly, participants don't make typos and other mistakes, so you can directly check the responses for the button text (when building a small chat bot, for instance).
You can add answer options to a Telegram message by putting a word or phrase into double squad brackets [[ and ]]. In the following example, we offer three answer options, bathroom, kitchen, and bedroom:
// reply to a Telegram message and offer three answer options
DF.telegramReply('Hey, can you tell us in which room you are right now? [[bathroom]] [[kitchen]] [[bedroom]]');
Exercises
Why not try and see if you got it?
Exercise 1: Retrieve the last item from an IoT dataset for a device in your project and send a message to the researcher if it is more than 24 hours ago.
Exercise 2: Retrieve the last item from an IoT dataset for a device in your project, find a participant in the same cluster as the device and change the user profile (Entity dataset) for this participant to activity: idle.
Function reference
You can use the following functions in Data Foundry scripts:
// print text
DF.print("some text to print out on the console")

// print an object as JSON
var data = {one: 1.2, two: 'wow!'}
DF.print(data)

// IoT dataset ---
// access the first active IoT dataset in project
// get event data for device 42
let items = DF.eventData.get(42)
// do same and limit to 200 items
let items = DF.eventData.get(42, 200)
// do same and filter by start and end time
let items = DF.eventData.get(42, 200, start, end)
// log data for device 42, with an activity and data
var data = {one: 1.2, two: 'wow!'}
DF.eventData.log(42, 'cooking activity', data)

// Entity dataset ---
// access the first active Entity dataset in project
// get all items from dataset
let items = DF.entity.getAll()
// get item with resource id 'user1' from dataset
let item = DF.entity.get('user1')
// add item with resource id 'user1' to dataset
var data = {one: 1.2, two: 'wow!'}
DF.entity.add('user1', data)
// update item with resource id 'user1' in dataset
var data = {one: 1.2, two: 'wow!'}
DF.entity.update('user1', data)
// delete item with resource id 'user1' from dataset
DF.entity.delete('user1')


// All datasets ---
// access specific dataset with id 100:
// get the last 200 items from this dataset from time start till end
let items = DF.eventData.from(100).get('', 200, start, end)
// same as before filtered by device with id 42
let items = DF.eventData.from(100).get(42, 200, start, end)
// log data for a device 42 to this dataset with an activity and data, only for IoT datasets
var data = {one: 1.2, two: 'wow!'}
DF.eventData.from(100).log(42, 'cooking activity', data)


// Simple statistics ---
// compute simple statistics over dataset 15 on key/column 'value1'
let st = DF.dataset(15).stats('value1')
// as before but stats computed for two keys/columns 'value1' and 'value2'
let st = DF.dataset(15).stats(['value1', 'value2'])
// compute stats filtered for device 'd1234567' and only for the last 40 items
let st = DF.dataset(15).filter('d1234567', 40).stats('value1')
// as before but filtered by start and end time as well
let st = DF.dataset(15).filter('d1234567', 40, start, end).stats('value1')


// Project resources ---
// get participant with id 'u12345678abcdef' from project
let p = DF.getParticipant('u12345678abcdef')
// get device with id 'd123456abcdef' from project
let d = DF.getDevice('d123456abcdef')
// get wearable with id 'w123456abcdef' from project
let w = DF.getWearable('w123456abcdef')


// OOCSI ---
// send message to OOCSI channel 'channelName' with data
var data = {one: 1.2, two: 'wow!'}
DF.oocsi('channelName', data)


// Telegram ---
// send Telegram message to researcher with 'hey, someone completed a survey'
DF.telegramResearchers('hey, someone completed a survey')

// send Telegram message to participant with id 'u12345678abcdef' with 'hey, thanks for sending some data'
// (see above how to retrieve the participant id)
DF.telegramParticipant('u12345678abcdef', 'hey, thanks for sending some data')

// reply to a Telegram message coming into this script
DF.telegramReply('hey, thanks for sending some data')